In this episode of the Digital Marketing with Bill Hartzer, I took some time to go over my detailed checklist for migrating and moving to another domain name. I’ve heard so many people say that you shouldn’t move to another domain name because there will be issues, you’ll lose traffic, or rankings. That’s simply not true; at least in my experience. All of the domain migrations that resulted in LOST traffic and dropped search engine rankings were a result of a bad domain migration. In other words, whoever did the migrating didn’t do something right. Or, they didn’t follow best practices for domain migrations. That’s why I’ve created a checklist for moving your website to another domain name.
In this episode, I gave my thoughts about doing due diligence before you move; and to give it some time before actually moving. For example, put some pages up on the domain you’re moving TO, then make sure that the domain name’s super clean, there are no issues, and crawling and indexing is going well. Then, use my domain migration checklist to do the domain migration. In the video, I explain all the steps.
Here is the full transcript from the video:
Bill Hartzer (00:02):
Hi, this is Bill Hartzer, and this is the digital marketing podcast with Bill Hartzer. For Thursday, July 22nd, 2021. So I want to go ahead and focus a little bit today on or mostly today on domain migrations and moving from one domain name to another. I’ve talked about this before and in different scenarios and different situations, different articles and different videos, but you know, today I want to go back through and, and talk a little bit about it today, specifically. So I’m gonna go ahead and share my screen here and let’s see, okay. Move a few things out of the way here. So I put together a checklist for moving from one domain name to another. And I want to go through that today. So keep in mind though that, you know, due diligence before you move is one of the things that is absolutely necessary.
Bill Hartzer (01:12):
And so that could either make or break your, your domain migration when you move. I know there are certain situations where you just have to move and you don’t ha you know, you don’t have a choice and that’s fine. But ideally you do have a choice and on when you are actually going to move, okay, take an example. What’s, you know, a company that has the.org and they’ve been using that as their main website and so forth, and they finally acquired the.com. And so they’re not, not, they really want to move in, I, in an ideal situation they, once they acquire that.com domain, they would actually, what you would want to do. And what they would want to do is basically establish a website on the same topic. Maybe take a few pages of content from your site and, and put it on that new domain.
Bill Hartzer (02:19):
You want to make sure that it’s on the same, same topic. If you say you’re a recruiter and you bought a name, a great name, and you’re going to be moving to it, you want to make sure there’s employment and recruiting type of content on that domain. You don’t want to just put up some old you know, other topic, if you will, like, you know dog and cat website, or, you know, or a personal website or something you want to make sure it’s on the same topic, because we want to establish the fact that, you know, what the search engine sexually SI that that’s what the topic of the domain is. And the website, and the reason why I want, we want to do that is for a few things we want to make. We want to verify them in Google search console and Bing webmaster tools.
Bill Hartzer (03:11):
We want to we want to, we want to look and see, look for errors and issues that particular you know, domain that you’re moving to. We want to make sure that there’s, it’s not risky that we move. We want to make sure that it’s all, you know, that the pages can get indexed. They can get crawled and index, and, and we want to work at, to see if there’s any penalties on the domain name that we’re moving to. Okay. Even though it’s a brand, maybe it is, if it’s a brand new domain name that you think, you know, that you think has never been registered before, you know, we’re now 30 plus years, you know, 20 plus years we at least into this main internet thing. And, you know, there’s a good chance that it was used at one point and so forth.
Bill Hartzer (04:03):
So doing that due diligence and making sure that the domain that we’re moving to is not having any problems we’ll want to check the links, want to check the links in Google search console. We want to see, like I said, that it can actually get crawled and indexed, and that there’s not any issues. If there are any issues with it, you’ll probably you’ll probably see them. And it will be you know, a parent you know, things like, for example, you verified Google search console and it’s ranking for all sorts of weird keywords that you, that have nothing to do with the topic of the domain. Or, you know, you see links that you’ve never seen before that are not out there. You know, when you check the wigs and majestic, for example. So basically give it some time establish that maybe even send some ma maybe put some mining pages on it, test the traffic.
Bill Hartzer (05:04):
You could establish, you know, you know, at some point you’re going to be moving to it. So maybe next month they can moving, but put, do some Google ads and, and Facebook ads to start sending some traffic to that domain, to some mining pages there just gets that start using it, start making it and, and so forth and so forth. So when it comes down to this checklist, I’ve, I’ve recently put this checklist out as a blog post, so you can copy it, paste it and use it any way you want. I’ve narrowed it down into basically four different sections, what you need to do. Pre-Move talk about, I talked a little bit about pre-planning what you need to do on moving day, and then after moving day, what you need to do afterwards. So basically that’s the fork, you know, what’s go, I’m going to go through in particular, but yeah, keep in mind that, you know, there may be some that you don’t need to actually do, but there may know, pretending on your situation.
Bill Hartzer (06:08):
There may be some that I just mentioned once, and that’s going to be a real big part of it of, of of the whole process. So it kind of depends on your situation, but this is a pretty good checklist I put together for, you know, with all the different migrations that I’ve done. So let’s talk about the first pretty moving that’s probably, you know, other than the due diligence, which I’ve mentioned and, and, you know, you’re kind of Canterbury, you move, technically speaking. You know, what we want to do is when I make a backup, a copy and we want to be working on the copy. So this is a good chance to probably make make, let’s say you’re going from the.org, the.com. Okay. Let’s make a copy of the site, the.org site on new, on new hosting, on a new server or, you know, or on the same server, but it may be a new instance.
Bill Hartzer (07:08):
Okay. Cause you’re going to need to maintain both copies one for the redirects on that out Oregon, the new site on the.com. So we want to have a copy, you know, essentially that we’re working on. And we want to that’s, you know, we want a separate backup, but also we want a copy. So we’re going to work on the copy. And so in that copy, we want to do some things and working on it to work on it. For example, we may need to do some changes for example, any references to the old domain and so forth, it gets to that, but let’s first, you know, make a copy, set up and consider a new hosting or a new server or something like that. Crawl the current website and start saving list of bay of URLs. Okay. And that’s, this is going to be key.
Bill Hartzer (07:58):
Any URLs that you can find anywhere, whether it’s in Google search console, whether those pages are in Google analytics whether or not they’re server log files anywhere you can find you are, you know, old URLs on the page, just make a list because we’re going to want to use those as redirects. And when we set those up. So we, you know, so even if it’s a version of the site that is from 10 years ago, there were pages that were URLs. If it was whatever, not HTML, and you’re not even using that HTML pages anymore, you still will want to get those redirects in place. Look at all the links. We’ve got all the links that are pointing to the site and some, you know, services like majestic and Atrius and SEM rush can give you lists of URL of, of URLs.
Bill Hartzer (08:54):
You’re going to want to basically have a massive list of every page possible that you could then potentially redirect. So can we view this, this new copy of the site? We want to look for references to the all domain. We may want to update the copy anywhere, mentions the old domain, make, you know, we want to make it ready for the new domain. So, you know, internally any internal links are going to have to go to the new domain rather than the Elba main thing, you know, you might have a logo that has the domain and main minute things like that. You’re going to have to really go over and QA and make sure it’s ready. I mentioned performing due diligence that, you know, on the new domain that you’re moving to, but yeah, that’s kind of the part of this pre-move process, you know, check all the links from other websites, you know, using majestic and so forth check all the links and, and, and make note of all the powerful links, because later on, you’ll probably want to get those updated to the new domain rather than having those go through a in particular, rather than having those go through a redirect it’s, you know, it’s preferable to have them go direct.
Bill Hartzer (10:17):
So for example so in this process, verify the site and Google search console. So we want to verify both sites, both domains, all the different versions, HTTP, HTTPS issue, DPW dub, dub dot, whatever.com, domain.com and all, you know, all the keep in mind, you’re going to have to set up HTTPS on the new domain, but you’re also gonna have to keep it going on the old domain, because any redirect will go to HTTP, you know, people going to HTTPS. So you don’t want, you don’t want them to get an error or, you know, and, and that redirect not occur and so forth when you’re doing that. Think about a press release, think about how you were going to announce to the public that you’re moving. That also may, even though you’re not a large company, maybe you want to get some more additional links and get, you know, when you get, have links, even as oppressors release link, the search engines will see it and it’ll cause them to crawl and, and so forth.
Bill Hartzer (11:26):
We want to get that activity moving with those links and, you know, think about a new marketing campaign. Are you getting, do you know, Google ads are, you get into some kind of, you know, how are you going to announce and how awareness of the new domain that’s important, you know, larger companies would probably, you know, do everything from radio, TV, billboard, and so forth and social media and online ads. Whereas you, you know, if you’re a small business, you may not need to do that, but keep in mind that’s available. Pre-Planning, let’s talk about a date, make a date and time. If you have a larger organization, you’re going to need to detail the process for moving everything. You know, maybe some things from this checklist or all these things in the checklist, or even additional things in your organization, who’s responsible for actually setting up the redirects, going on the domain name and logging into the registrar and changing the names servers.
Bill Hartzer (12:29):
You’re going to have to, you know, figure all that out. Give it a date and time reasonably where you’ve QA, the new version of the site and so forth, even though it’s the same email as the same exact site, you’re still gonna need to fix the internal links and so forth. And, and you’re gonna, you know, you’re going to have to do that. So when you’re actually ready to move, you know, add the 3 0 1 redirects, okay, we don’t want the, we, they should not be temporary. There should be 3 0 1 redirects. We were going to go to, you know, page to page. So all domain.com/contact should redirect the old domain.com. Our new domain.com/contact page to page. You don’t want the old domain flash slash contact to go to the home page of the new domain. You want it to go to the equate, the equivalent tides date page of the new domain.
Bill Hartzer (13:27):
Now keep in mind, you may want to even relook at all the pages on your site, because you may not need all that content, or you may want to add, to add additional content. If you’re removing pages from the old domain, when you’re moving, you will still want to set up those redirects that they re you know, the redirect to the appropriate page on that, on the new domain, the same category, okay, you’re going to notify well, you’re going to call the website once it’s live, crawl the new website with a crawler and look for errors that you’ve missed.
Bill Hartzer (14:07):
I’ve done a lot of re a lot of domain migrations, and frankly, I’m not perfect. And sometimes will find something that I didn’t. I forgot about it happens. Notify Google of the change of address. They have a change of address form that you can actually fill you, fill out. Do you notify them officially? I recommend that. If you can, because I believe that if you do rec you know, if you have their file, that you’re the owner of both domains and you’re actually moving, there’s a good chance that they’ll, they’ll pass all the wing Jews or all the credit from the old domain to the new one. If you just do a 3 0 1, you don’t not notify them, you may lose some, some of that. That’s just my speculation, but that’s why they kind of give us the change of address form update the analytics with the new domain, because you’ll, you’ll want, you know, you’ll want both, you want both to be there because you’ll want to be able, you want to use the same Google analytics account on both domains.
Bill Hartzer (15:15):
Don’t go ahead and, and just and start, don’t start a new analyst because you’ll want to see the progression of when you moved, what the traffic was. You want to monitor that and how that’s going. A social media profiles, new domain name updates, email signatures, email addresses. So you might email there, you know, if you’re in an organization that you’re using, you know, everybody’s used to sending or receiving email and the ultra Maine, give it some time for them to move over and have a plan for that. There’s, there’s a best, it may for scent, you know, you want, you may want to have both emails still wives. So you can still receive email to the old domain after a period of time. And, you know, just don’t cut it off because then you’re not going to receive any to the, you know, to the old domain, any internal documents, newsletters, you know, you may want to do a press release to get some more links get some mentions out of the new domain at PBC campaigns.
Bill Hartzer (16:25):
I mentioned, you know, in do deal in due diligence in particular that you may want to, you know, have that new domain live already and be pushing some PBC traffic to that ahead of time before you actually do the full move. You know, so you may want to update those. And then also, you know, if you do happen to receive, you know, some, some traffic loss which shouldn’t be major at all, you may want to, you know, the PPC campaigns to can compensate for any, you know, that traffic clause customers, clients, business partners, see if you can get those links changed. As many as you can, because once, like I said, if you have a link from another website and they does the re 3 0 1 redirect, and then it goes to your site, you’re going to lose some of that value through that redirect, if you can get that updated, that’s going to make sure you don’t lose that.
Bill Hartzer (17:28):
So after moving day after you’ve moved, you know, watch gain analytics Briony, traffic and chain traffic changes. We also want to look at w you know, work for ranking changes and so forth and just continue to work on getting new links to the note new domain name, basically it’s the payroll process is not very difficult. However, the key here is really working on you know, in fact, it’s actually just working specifically on doing the due diligence to make sure and double is sure, you know, that the new domain is clean and there’s not any issues. And you have those redirects set up. Generally speaking that there shouldn’t be any problems. If you do run into anything, feel free to get in touch with me in particular, and I’ll be happy to take a look and, you know, see if I can advise you about, you know, if there’s anything that I see that could be fixed. So that said, this has been the digital marketing, digital marketing with Bill Hartzer podcast for July 22nd, 2021. Thanks so much for listening today, and we’ll see you online.
If you want to earn more sales for your business, you need to make sure your website is optimized for conversions.
Your website’s design can impact whether people purchase from your business or choose a competitor instead. In fact, first impressions of businesses are 94% design-related.
Without a beautifully-designed and functional website, you won’t earn conversions or revenue for your business. So, if you’re building a website on Shopify, you want to ensure you choose a functional, high-converting theme that keeps prospects engaged and earns you more sales.
On this page, we’ll provide you with four of the best-converting Shopify themes you can use for your website. Keep reading to learn more!
We don't just want to tell you about the beautiful work we do.
When you choose a theme, you can run the page through PageSpeed Insights to see the theme’s load time. PageSpeed Insights will all present you with suggestions for improving your site load time, so you can ensure you deliver a positive user experience.
2. Call to action (CTA) buttons
Another important feature you want to ensure you have with your Shopify theme is call to action (CTA) buttons. If you want people to act on your site, you must encourage them by using CTA buttons. These buttons guide visitors on how to proceed next.
When you choose a theme, you want to ensure you can craft custom CTA buttons to guide users at different points in the marketing funnel. So, whether you have visitors just getting familiar with your products or ready to convert, you need to be able to craft CTA buttons that help them take the next step.
3. Functional navigation
When you’re looking at the best-converting Shopify themes, you’ll find that all of them have functional navigation. Your navigation is a crucial component of your website’s success. People use this feature to help them navigate through your site and find the information they need.
You want to pay attention to the type of navigation your theme offers to ensure it meets your needs. If you offer many products, you want to ensure you’re choosing a theme that can support an extensive product catalog, so you can build a big enough navigation to organize your products.
When you look at Shopify themes, make sure they offer responsive design or indicate they are mobile-friendly. Both are indicators that your site will deliver a positive mobile experience.
4 of the best-converting Shopify themes
Now that we’ve covered the must-have elements for your Shopify theme, let’s look at the highest converting Shopify themes you can use to build your site!
But before we dive into these themes, keep in mind that every Shopify theme comes with the following:
Now that we’ve covered those elements, let’s dive into the four best Shopify themes for conversions!
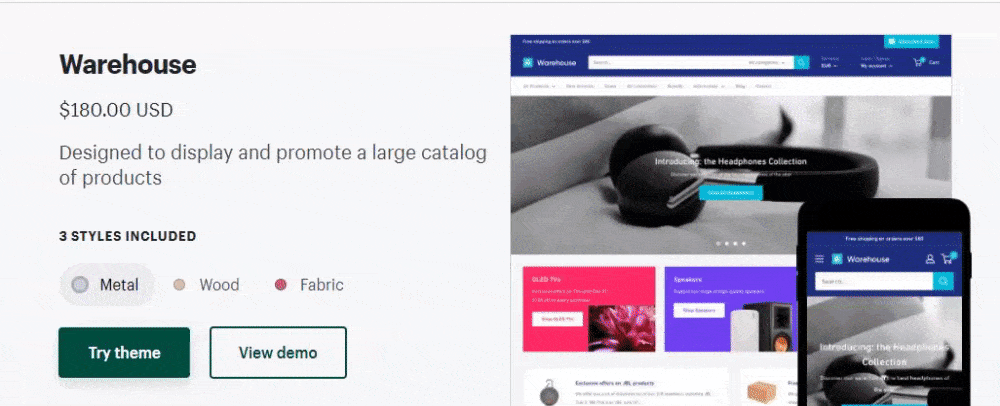
1. Warehouse
Cost: $180
Styles: Metal, Wood, and Fabric
First on our list of the highest-converting Shopify themes is Warehouse. This theme offers numerous features that help you deliver a user-friendly website.
Here are some features of the Warehouse theme:
Large product catalog: This theme supports large product catalogs. This theme can support you adding hundreds of products to your website if you offer dozens of products.
Predictive search: This Shopify theme also offers a predictive search feature. With the predictive search results, visitors can display live search results. This feature enables people to see quick links to product pages on your site so that users can find products fast.
Custom promotion tiles: With this theme, you can build custom promotion tiles to sell your products. From sales to discounts to featured products, you can use this feature to promote products and earn more sales.
Exit popups: If people try to leave your page, this theme lets you encourage customers to sign up for an email list or newsletter before leaving. It’s a great feature to help you capture leads for your business that can turn into sales later.
Trust badges: This theme offers a dedicated card to showcase your security and payment badges. It’s a great way to show people your site is secure and highlight what payment options they can use to buy products.
2. Handy
Cost: $180.00
Styles: Light, Cool, Fresh
Next on our list of best-converting Shopify themes is Handy. This theme offers numerous features that enable you to build a positive user experience for your audience.
Here are some of the defining features of the Handy theme:
Large product catalog: If you have many products, this theme can support dozens of product uploads.
Mobile-first design: While every Shopify theme is built for mobile, Handy is explicitly made for mobile-first (most themes adapt from desktop to mobile). This theme is excellent for delivering a top-notch mobile experience.
Contact bar: The Handy theme has a built-in contact bar that enables you to display information, store hours, and your business’s location with stylized icons. Providing this information allows you to make it easy for customers to reach out to your business.
Search-focused navigation: Handy offers a search-focused menu that makes it easy for shoppers to search for what they need. They can search by product or tag to find what they need fast.
Continuous product scroll: This feature enables you to keep users scrolling through your product pages to find what they want. It’s a great feature to keep users engaged, which can ultimately increase sales.
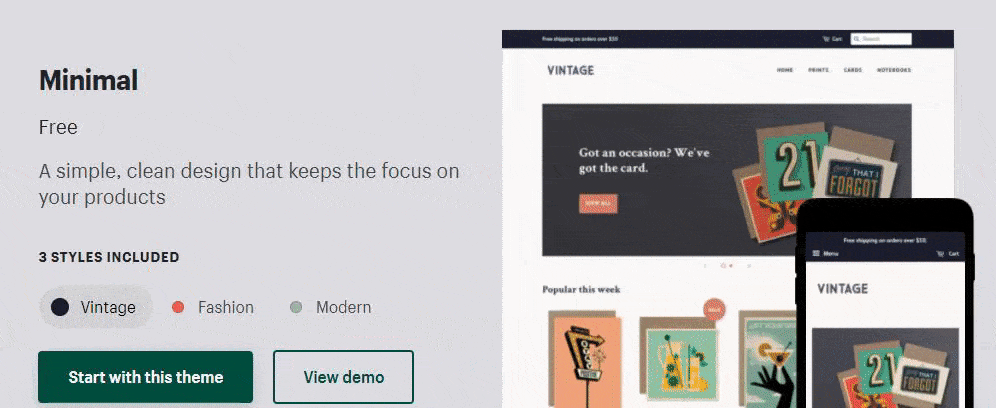
3. Minimal
Cost: Free
Styles: Vintage, Fashion, and Modern
Next on our list of the best Shopify themes for conversions is Minimal. This free theme is a great option if you’re looking for an affordable option that can help you increase sales.
Here are some of the features of this Shopify theme:
Product filtering: With this feature, you can allow shoppers to filter products by type, best sellers, or price. It makes it easy for shoppers to find what they need fast, which leads to a positive user experience and more sales.
Product image zoom: People can zoom in on your products and get more details with this feature. With online shopping, it’s a crucial component to have so that shoppers can see all the product features. It’s a great way to earn more sales for your business.
Product recommendations: With this feature, you can showcase recommended products on product pages to help people discover items they’ll love.
4. Venture
Cost: Free
Styles: Snowboards, Outdoors, and Boxing
Next on our list of best Shopify themes is Venture. This free theme is a great option if you want something affordable that offers all the services you need.
Here are a few features that come with this theme:
Promotional banner: You can promote your latest sale or promotion at the top of your store’s homepage with this feature. It’s a great way to catch your audience’s attention and get them interested in the special deals you offer.
Multi-column menu: With this feature, you can showcase your product details and images in an extensive, multi-column drop-down menu. It’s a great feature to help you provide your audience with all the information they need about your products.
Product filtering: With this Shopify theme, you can add a product filtering feature to help shoppers find what they need faster. It makes it easy for your audience to navigate to the products they want.
Single featured product: With this feature, you can promote a single product and feature it front and center on your homepage. It’s an excellent way for you to promote best sellers or new products and encourage sales from visitors.
Need help finding the best-converting Shopify theme for your business?
Building the perfect Shopify store is key to helping your business earn more sales. If you need help finding the right theme and designing your site to boost conversions, WebFX can help.
Our award-winning team of designers knows how to craft websites that drive results. In the past five years, we’ve driven over $2.4 billion in sales and over 6.3 million leads for our clients. You can feel confident we’ll craft a website that helps your business grow online.
My animated short film became a digital kid’s book through Storypanda — more on this story at the end. Follow these steps and you too will learn how to create animated videos!
My story is based on the love my grandparents had for each other. After the passing of my grandmother, my grandfather died not long after due to a broken heart.
I wanted to tell a story close to my heart and dedicate my short animated film to my grandparents.
Once you figure out what you want to tell or show you can start to storyboard it.
You can write a script as well if you prefer a more definitive plan. But, if your story is still developing, start drawing and let your creativity dictate the direction of the film.
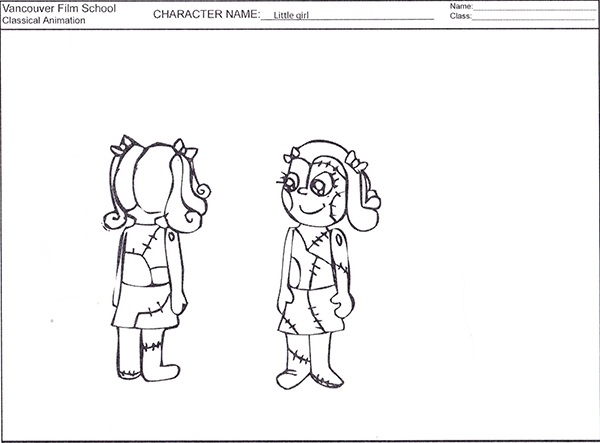
Step 2: Create the Characters
A good place to start is designing the characters for your animated video.
I developed my characters in a 3/4 rotation. This just means that your characters aren’t directly facing the viewer; they’re angled 3/4ths to the left or right (as you can see below):
If you like, you can draw your characters from several viewpoints (such as facing towards the viewer and away from the viewer so that they can see the details).
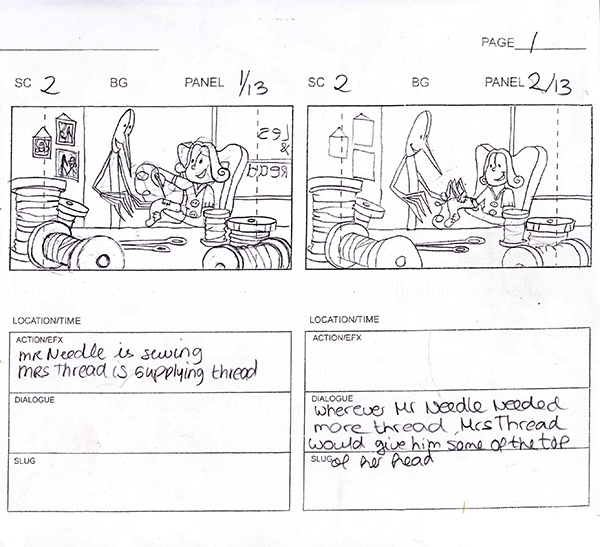
Step 3: Create Your Storyboard
A storyboard does not need to be super realistic, but I do recommend that you draw all the key poses. It will make things a lot easier down the road.
Once you finish all the panels make sure to label them well for good organization.
After you are happy with the result you can scan them so that you can have them in digital format.
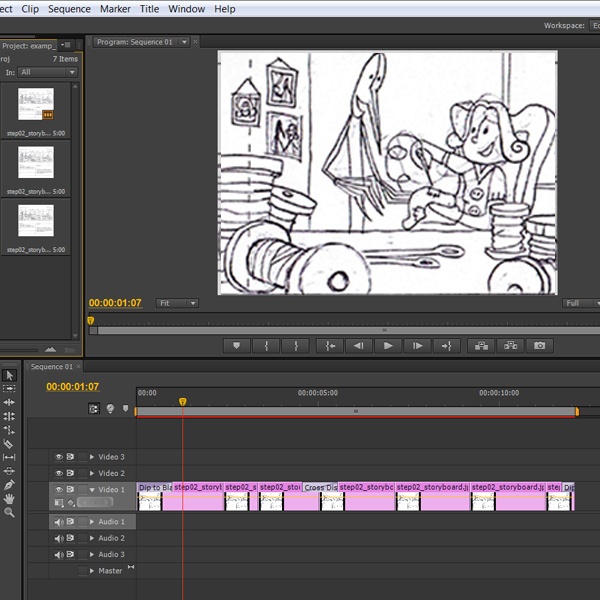
When you finish scanning in your panels, you can move them into an editing program. I used Premiere Pro because it worked well with After Effects and Photoshop.
It will be a bit of work to separate all the panels and save them all as layers in your favorite graphics or video editor. The amount of work will depend on how many panels you drew.
Step 4: Create the Animatics
At this step, you’re at the fun part of making animatics.
What are animatics? They are a simple mock-up of how the film will roughly look. In our case, it could just be a video of our panels in sequence to give us an idea of how the story flows.
You can start timing how the elements work together as they move.
Step 5: Creating the Background Layout
Now that we have a solid story and the animatics look good, we can start the video production.
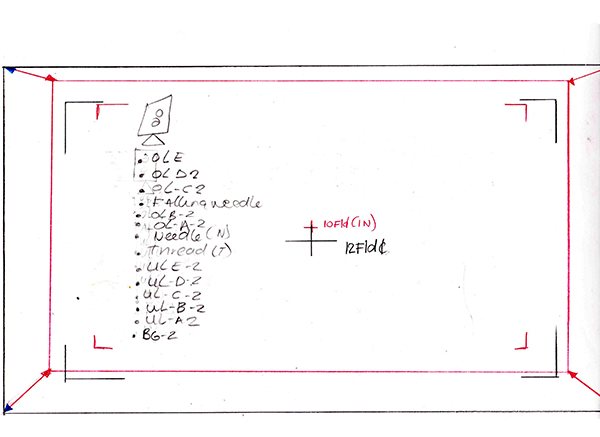
We can start with the background layout.
You can get started drawing them in the right field size based on your field guides.
Since you know what your backgrounds look like already, be sure you only draw what will be in the shot. For example, you don’t need to draw an entire room when you will only be using a piece of a table.
If you are re-using the background later in a different field size, draw a bigger-sized background so you can use it for both without losing any pixels.
Tip: If you decided on a close-up at the beginning, and later you change your mind to a mid-shot, you need to move the camera to get the shot you want. This is when cam keys come in handy. Cam keys show the field size you will use for each scene.
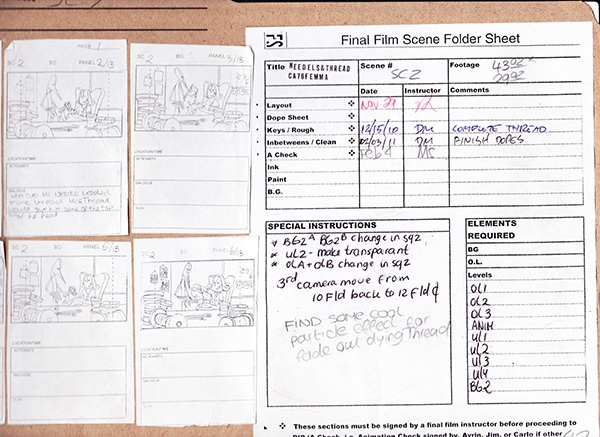
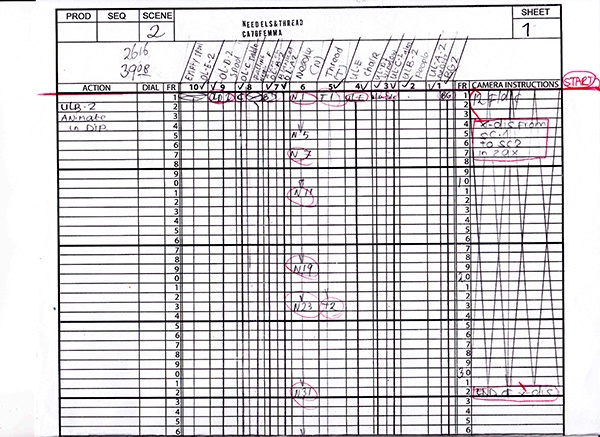
A well-prepared dope sheet will help you when you start animating. This is an example of a dope sheet I used for my animation:
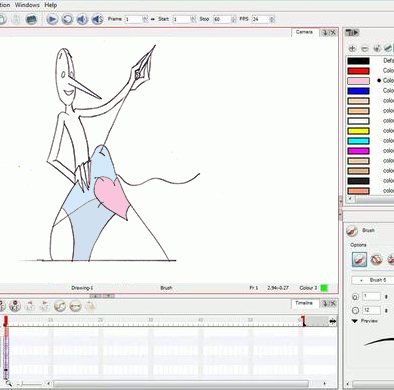
Step 7: Create the Rough Animation
After timing the animation you can actually start animating. Start animating roughly. Keep the lines loose and push the poses. Use the key poses you drew in the storyboards.
Write down on your dope sheet how many in-betweens you want after clean-up (more on these two processes later). Try to keep characters on separated layers.
Step 8: Clean-up
Once you are happy with your animation, you can start cleaning up the line art.
You’ll need to decide what type of line you would like to use. There are different types of line art you can choose from. Normal lines are all the same thickness while rough lines are not closed and make your animations look like they are dancing. Cartoony lines are thick around the border with thin lines on the inside.
With my animation, I used a normal line because it worked best with the style I was going for.
Cleaning up rough animation can be tedious work, but when you do it right it will make inbetweening (which I will talk about in the next step) and coloring much easier.
Step 9: Inbetweening
In-betweens are vital for smooth animation. Keys lead the animation but the in-betweens smooth out the movements. This process is called inbetweening or tweening.
You don’t always need a ton of in-betweens. When you animate an action shot, you can get away with a few keys and one or two in-betweens. For subtle animation, more in-betweens give you a smoother result.
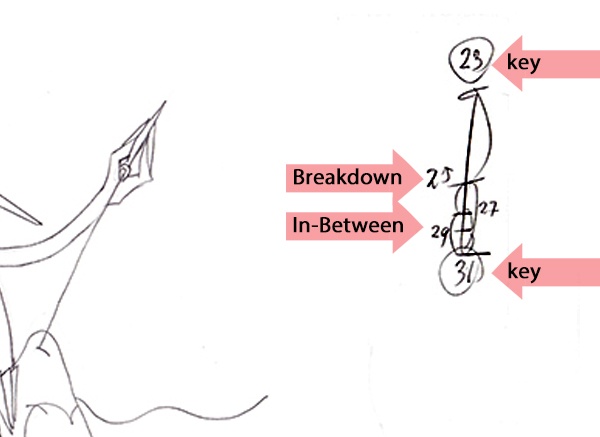
I’ll give you an example of an in-between I made using the diagram below.
First I put in number 23 and 31 on a light box.
To add in-betweens to this, you would label it with number 25. Always start with the breakdown. In this case, number 25 is exactly halfway between 23 and 31.
On the light box you start drawing right in between the two lines of those drawings and that is how you create the breakdown.
When you are done, you take drawing number 25 and 31 and you inbetween those to create number 27.
After you are done with that one, you take number 27 and 31 to create the last one in the scene number 29.
Step 10: Digital Inking and Painting of the Backgrounds
Background artwork will need to be added behind your characters using inking. You can ink it the old fashioned way with crayons or paint, or you can scan the artwork and paint it with a program like Photoshop.
My backgrounds are a mix of scanned crayons, water paints, and Photoshop.
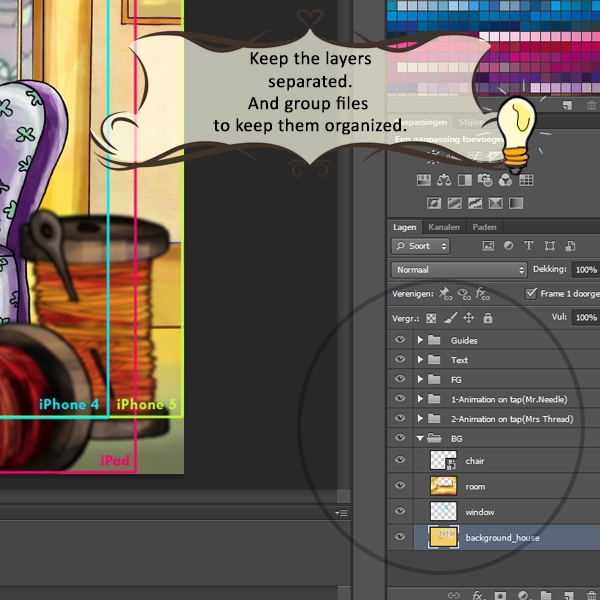
It’s very important to label all your layers and keep them separate because the animation will be placed in between the layers to create depth.
Step 11: Digital Inking and Painting of the Characters
Once you get to this step, all your animation has been cleaned up, inbetweened and is ready for coloring.
When I made my short, I had the privilege of using a scanner specialized for scanning animation. I also used software called Toon Boom to ink all the characters. This program is very easy to use and it made coloring the characters much easier.
Now the hard work of clean-up that we did earlier really pays off. With great line work and closed lines, coloring will be a walk in the park.
If you have lots of open lines, it will be harder to use the paint bucket tool to fill all animations fast and efficiently.
Step 12: Compositing
When all the artwork and characters are painted you can use Toon Boom to composite it.
Compositing is the process of combining all the elements into one scene.
You can also use any other program you like to work in.
Now you put the whole movie together and make it flow into one.
Making My Animation Short into a Digital Book
I want to just share my story of how I made the animation short film into a digital book. I hope this story will inspire you to pursue a career in animation or other creative fields.
After my animation short film gained some attention at various film festivals, I was contacted by a mobile publisher called Storypanda.
I worked with them to turn my short into an interactive kid’s book app.
For the book, I did not have to create any new animation. I did, however, have to separate all the animation from the composite I created when I made my short animation.
All layers were labeled and I used a field guide delivered by Storypanda to ensure none of the artwork was lost when you view the book on the iPad.
As an animator, I was thrilled to see my work move on the iPad.
I think digital is truly a new source of opportunity for the creative industry.
Adding a simple tooltip into your page or app isn’t difficult. You can easily find a multitude of JavaScript tooltip plugins and scripts that will all work perfectly well.
But pure CSS is often a better option and has become the preferred choice for many web designers. If you’re looking for pure CSS tooltips, then this collection of free code snippets should have something for you. All of the below tooltip snippets are available for you to fork, copy, or restyle for your website.
1. Product Feature Highlights by Ian Farb
We kick off with a snippet for a product feature tooltip. And, it is simply incredible. By appending the tooltips onto a DIV element, you can position them anywhere on top of an image. This way, the user can hover to get further information about the product’s style, design, format, whatever.
The tooltips themselves look clean with a white background and a small drop shadow. These example tooltips can be used in any layout style, so they are perfect for product callouts.
If you are looking for custom animated tooltips, this CSS snippet is for you. The tooltips come in three different styles:fading, expanding, and swing motion.
They are all fairly simple to add to any page, and use the HTML5 data-title attribute for defining the tooltip text. This means you don’t need any extra HTML to get these working.
With these automation tooltips, you’ll notice two things: they blend nicely with the anchor links, and they rely on just a little JavaScript.
Even though they have not been built using pure CSS, we had to include them because they’re just so practical. We wouldn’t say these tooltips are for everyone because they require a specific type of site to really “fit in” with the content.
You often see little question mark icons in larger forms and more complex pages. They’re useful for informing users about specific parts of the page or for further guidance.
Again this works on the HTML5 data-* attribute, so all of your tooltip information can go right inside. And, with the code being fully open-sourced, you can even edit the animation style and color scheme to blend in better with your own project.
These tooltips are perfect as everyday run-of-the-mill tooltips for any website. They work on pure CSS, and they’re effortless to customize if you dig into the code.
By default, each tooltip uses a slightly darkened background with a translucent opacity. This can be tough to read if your tooltip appears on top of another paragraph. But with a small change to the CSS, you can restyle the color scheme for readability.
These tooltips don’t have custom animation effects, so they might feel a bit stale compared to some of the others in this collection. But they are fully compliant with modern browsers, and they behave exactly as you would expect.
7. Animated Button with Tooltip by Aditya Bhandari
This custom animated button tooltip is certainly unique. It appears when hovering and fades into view with a top-down animation. It works on any button or link using the class .button, and appears using the pseudo-classes :before and :after. This tooltip would be useful if you are designing a page with a download section or signup forms.
We are big fans of text-based tooltips since they are a classic of the web. With these pure CSS tips, you will not only get a clean user interface but also a really nice animation effect while hovering.
The actual tooltip has a small delay which is typical of the standard browser tooltip. It uses CSS animation to float into view. Plus, it changes the default cursor style to a question mark cursor, a design pattern related to links that aren’t usually clickable.
This example is another information-type tooltip using the “i” info icon. You can easily copy this CSS to run on any page element that might support an info-based tooltip.
The animation style is clean, but it is a little slow for our taste. Thankfully you have full access to the source code, so you can edit the animation speed, style, location, and pretty much everything else.
This donut chart uses some incredible tooltips. Data charts always work better with tooltips. They allow you to share extra data and information about certain areas of the chart, even when there is not much room on the page. You will notice that this example does run with a little bit of JavaScript, but it’s primarily used for the donut graph effect.
The tooltips do appear based on the JavaScript data, so they don’t require any extra HTML. This makes it tougher to customize but also gives you more control over the style, position, and behavior of the tooltip.
Computers have wedged themselves into every facet of our lives—they are what we would use as the symbolic representation of the modern world.
But did you know that the history of computers dates back to the 1800s?
Indeed, the history and evolution of computers is quite extraordinary—and with many early computing technology innovations tied to defense contracts, much of this information were kept secret from the public for decades. In this article, we explore the development and progression of computers.
Mid-1800s-1930s: Early Mechanical Computers
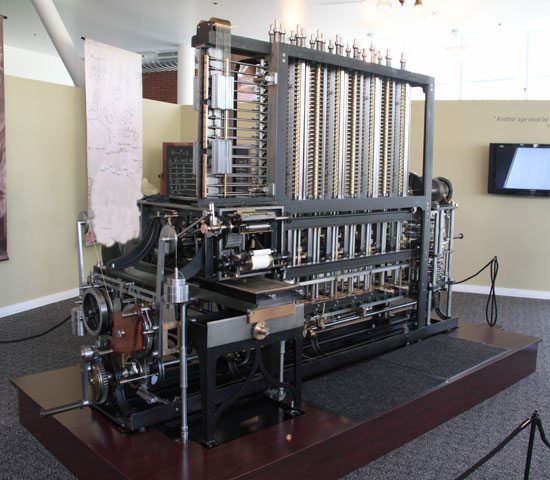
The first computers were designed by Charles Babbage in the mid-1800s, and are sometimes collectively known as the Babbage Engines. These include the Difference Engine No. 1, the Analytical Engine, and the Difference Engine No. 2.
The Difference Engine was constructed from designs by Charles Babbage. Photo by Allan J. Cronin
These early computers were never completed during Babbage’s lifetime, but their complete designs were preserved. Eventually, one was built in 2002.
While these early mechanical computers bore little resemblance to the computers in use today, they paved the way for a number of technologies that are used by modern computers, or were instrumental in their development. These concepts include of the idea of separating storage from processing, the logical structure of computers, and the way that data and instructions are inputted and outputted.
Z1 was used to take the U.S. Census in 1890.
Other important mechanical computers are the Automatic Electrical Tabulating Machine—which was used in the U.S. Census of 1890 to handle data from more than 62 million Americans—and the first binary computer: Konrad Zuse’s Z1, which was developed in 1938 and was the precursor to the first electro-mechanical computer.
1930s: Electro-Mechanical Computers
Electro-mechanical computers generally worked with relays and/or vacuum tubes, which could be used as switches.
Some electro-mechanical computers—such as the Differential Analyzer built in 1930—used purely mechanical internals but employed electric motors to power them.
These early electro-mechanical computers were either analog or were digital—such as the Model K and the Complex Number Calculator, both produced by George Stibitz.
Stibitz, by the way, was also responsible for the first remote access computing, done at a conference at Dartmouth College in New Hampshire. He took a teleprinter to the conference, leaving his computer in New York City, and then proceeded to take problems posed by the audience. He then entered the problems on the keypad of his teleprinter, which outputted the answers afterward.
Z3 used floating-point numbers which improved the accuracy of calculations.
It was during the development of these early electro-mechanical computers that many of the technologies and concepts still used today were first developed. The Z3, a descendent of the Z1 developed by Konrad Zuse, was one such pioneering computer. The Z3 used floating-point numbers in computations and was the first program-controlled digital computer.
Other electro-mechanical computers included Bombes, which were used during WWII to decrypt German codes.
1940s: Electronic Computers
Colossus—whose name was fitting for its size—was developed during World War II.
The first electronic computers were developed during the World War II, with the earliest of those being the Colossus. The Colossus was developed to decrypt secret German codes during the war. It used vacuum tubes and paper tape and could perform a number of Boolean (e.g. true/false, yes/no) logical operations.
Williams Tube used RAM for its computations.
Another notable early electronic computer was nicknamed “The Baby” (officially known as the Manchester Small-Scale Experimental Machine). While the computer itself wasn’t remarkable—it was the first computer to use the Williams Tube, a type of random access memory (RAM) that used a cathode-ray tube.
Some early electronic computers used decimal numeric systems (such as the ENIAC and the Harvard Mark 1), while others—like the Atanasoff-Berry Computer and the Colossus Mark 2—used binary systems. With the exception of the Atanasoff-Berry Computer, all the major models were programmable, either using punch cards, patch cables and switches, or through stored programs in memory.
1950s: The First Commercial Computers
The first commercially available computers came in the 1950s. While computing up until this time had mainly focused on scientific, mathematical, and defense capabilities, new computers were designed for business functions, such as banking and accounting.
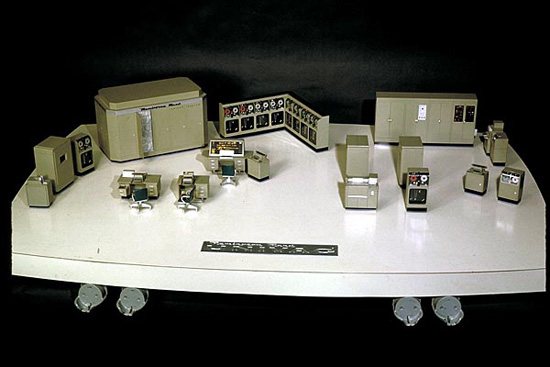
The J. Lyons Company, which was a British catering firm, invested heavily in some of these early computers. In 1951, LEO (Lyons Electronic Office) became the first computer to run a regular routine office job. By November of that year, they were using the LEO to run a weekly bakery valuations job.
The UNIVAC was the first mass-produced computer.
The UNIVAC was the first commercial computer developed in the U.S., with its first unit delivered to the U.S. Census Bureau. It was the first mass-produced computer, with more than 45 units eventually produced and sold.
The IBM 701 was another notable development in early commercial computing; it was the first mainframe computer produced by IBM. It was around the same time that the Fortran programming language was being developed (for the 704).
The IBM 650 would cost you $4 million dollars if you bought it today.
A smaller IBM 650 was developed in the mid-1950s, and was popular due to its smaller size and footprint (it still weighed over 900kg, with a separate 1350kg power supply).
They cost the equivalent of almost $4 million today (adjusted for inflation).
Mid-1950s: Transistor Computers
The development of transistors led to the replacement of vacuum tubes, and resulted in significantly smaller computers. In the beginning, they were less reliable than the vacuum tubes they replaced, but they also consumed significantly less power.
IBM 350 RAMAC used disk drives.
These transistors also led to developments in computer peripherals. The first disk drive, the IBM 350 RAMAC, was the first of these introduced in 1956. Remote terminals also became more common with these second-generation computers.
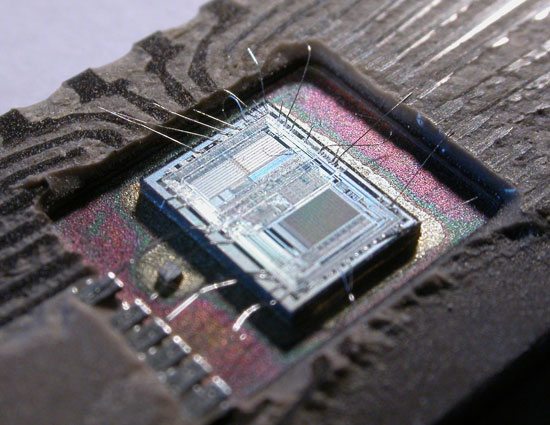
1960s: The Microchip and the Microprocessor
The microchip (or integrated circuit) is one of the most important advances in computing technology. Many overlaps in history existed between microchip-based computers and transistor-based computers throughout the 1960s, and even into the early 1970s.
Micochips allowed the manufacturing of smaller computers. Photo by Ioan Sameli
The microchip spurred the production of minicomputers and microcomputers, which were small and inexpensive enough for small businesses and even individuals to own. The microchip also led to the microprocessor, another breakthrough technology that was important in the development of the personal computer.
There were three microprocessor designs that came out at about the same time. The first was produced by Intel (the 4004). Soon after, models from Texas Instruments (the TMS 1000) and Garret AiResearch (the Central Air Data Computer, or CADC) followed.
The first processors were 4-bit, but 8-bit models quickly followed by 1972.
16-bit models were produced in 1973, and 32-bit models soon followed. AT&T Bell Labs created the first fully 32-bit single-chip microprocessor, which used 32-bit buses, 32-bit data paths, and 32-bit addresses, in 1980.
The first 64-bit microprocessors were in use in the early 1990s in some markets, though they didn’t appear in the PC market until the early 2000s.
1970s: Personal Computers
The first personal computers were built in the early 1970s. Most of these were limited-production runs, and worked based on small-scale integrated circuits and multi-chip CPUs.
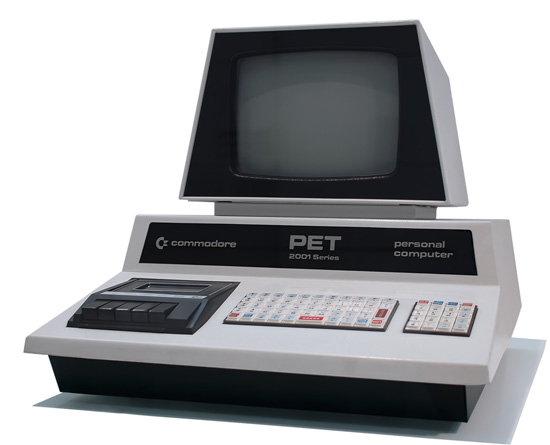
The Commodore PET was a personal computer in the 70s. Photo by Tomislav Medak
The Altair 8800 was the first popular computer using a single-chip microprocessor. It was also sold in kit form to electronics hobbyists, meaning purchasers had to assemble their own computers.
Clones of this machine quickly cropped up, and soon there was an entire market based on the design and architecture of the 8800. It also spawned a club based around hobbyist computer builders, the Homebrew Computer Club.
1977 saw the rise of the “Trinity” (based on a reference in Byte magazine): the Commodore PET, the Apple II, and the Tandy Corporation’s TRS-80. These three computer models eventually went on to sell millions.
These early PCs had between 4kB and 48kB of RAM. The Apple II was the only one with a full-color, graphics-capable display, and eventually became the best-seller among the trinity, with more than 4 million units sold.
1980s-1990s: The Early Notebooks and Laptops
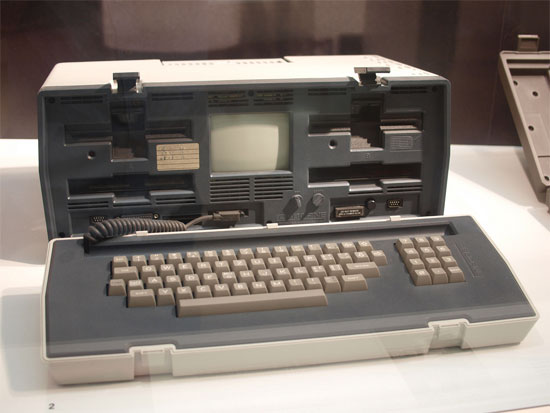
One particularly notable development in the 1980s was the advent of the commercially available portable computer.
Osborne 1 was small and portable enough to transport. Photo by Tomislav Medak
The first of these was the Osborne 1, in 1981. It had a tiny 5″ monitor and was large and heavy compared to modern laptops (weighing in at 23.5 pounds). Portable computers continued to develop, though, and eventually became streamlined and easily portable, as the notebooks we have today are.
These early portable computers were portable only in the most technical sense of the word. Generally, they were anywhere from the size of a large electric typewriter to the size of a suitcase.
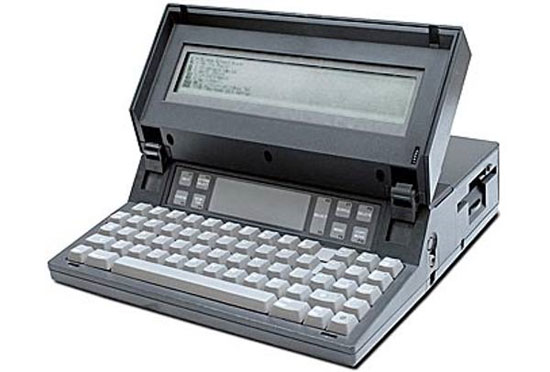
The Gavilan SC was the first PC to be sold as a “laptop”.
The first laptop with a flip form factor, was produced in 1982, but the first portable computer that was actually marketed as a “laptop” was the Gavilan SC in 1983.
Early models had monochrome displays, though there were color displays available starting in 1984 (the Commodore SX-64).
Laptops grew in popularity as they became smaller and lighter. By 1988, displays had reached VGA resolution, and by 1993 they had 256-color screens. From there, resolutions and colors progressed quickly. Other hardware features added during the 1990s and early 2000s included high-capacity hard drives and optical drives.
Laptops typically come in three categories, as shown by these Macbooks. Photo by Benjamin Nagel
Laptops are generally broken down into a three different categories:
Desktop replacements
Standard notebooks
Subnotebooks
Desktop replacements are usually larger, with displays of 15-17″ and performance comparable with some better desktop computers.
Standard notebooks usually have displays of 13-15″ and are a good compromise between performance and portability.
Subnotebooks, including netbooks, have displays smaller than 13″ and fewer features than standard notebooks.
2000s: The Rise of Mobile Computing
Mobile computing is one of the most recent major milestones in the history of computers.
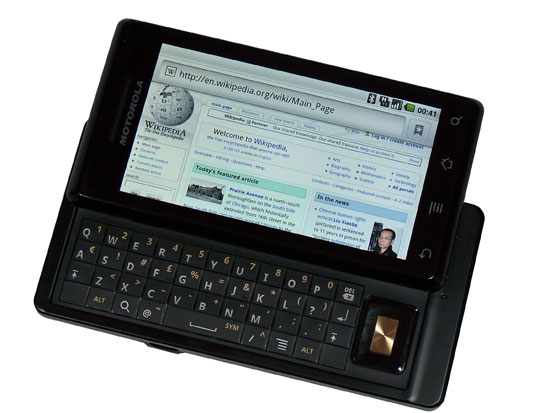
Many smartphones today have higher processor speeds and more memory than desktop PCs had even ten years ago. With phones like the iPhone and the Motorola Droid, it’s becoming possible to perform most of the functions once reserved for desktop PCs from anywhere.
The Droid is a smartphone capable of basic computing tasks such as emailing and web browsing.
Mobile computing really got its start in the 1980s, with the pocket PCs of the era. These were something like a cross between a calculator, a small home computer and a PDA. They largely fell out of favor by the 1990s. During the 1990s, PDAs (Personal Digital Assistant) became popular.
A number of manufacturers had models, including Apple and Palm. The main feature PDAs had that not all pocket PCs had was a touchscreen interface. PDAs are still manufactured and used today, though they’ve largely been replaced by smartphones.
Smartphones have truly revolutionized mobile computing. Most basic computing functions can now be done on a smartphone, such as email, browsing the internet, and uploading photos and videos.
Late 2000s: Netbooks
Another recent progression in computing history is the development of netbook computers. Netbooks are smaller and more portable than standard laptops, while still being capable of performing most functions average computer users need (using the Internet, managing email, and using basic office programs). Some netbooks go as far as to have not only built-in WiFi capabilities, but also built-in mobile broadband connectivity options.
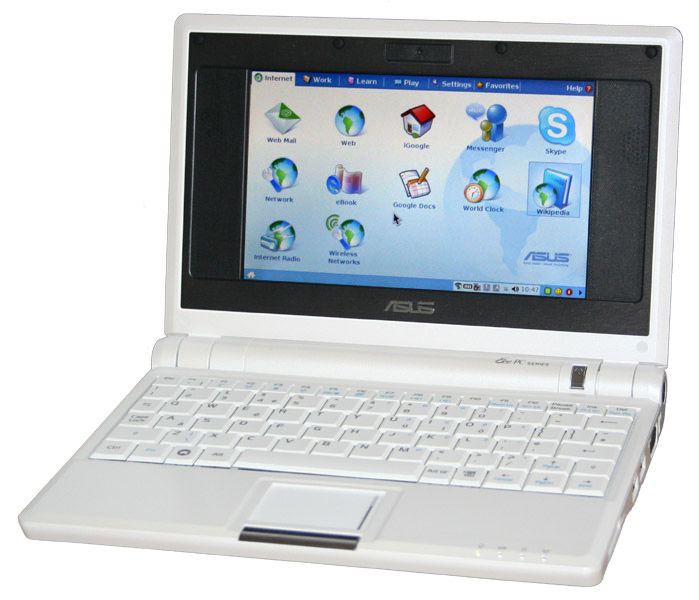
The Asus Eee PC 700 was the first netbook to enter mass production.
The first mass-produced netbook was the Asus Eee PC 700, released in 2007. They were originally released in Asia, but were released in the US not long afterward.
Other manufacturers quickly followed suit, releasing additional models throughout 2008 and 2009.
One of the main advantages of netbooks is their lower cost (generally ranging from around US$200-$600). Some mobile broadband providers have even offered netbooks for free with an extended service contract. Comcast also had a promotion in 2009 that offered a free netbook when you signed up for their cable internet services.
Most netbooks now come with Windows or Linux installed, and soon, there will be Android-based netbooks available from Asus and other manufacturers.
The history of computing spans nearly two centuries at this point, much longer than most people realize. From the mechanical computers of the 1800s to the room-sized mainframes of the mid-20th century, all the way up to the netbooks and smartphones of today, computers have evolved radically throughout their history.
The past 100 years have brought technological leaps and bounds to computing, and there’s no telling what the next 100 years might bring.


