Interview with Stephen S. Musoke

Show Notes
Audio
This episode is sponsored by
Using the WordPress REST API

The post Interview with Stephen S. Musoke appeared first on Voices of the ElePHPant.
Comments are closed.
The post Interview with Stephen S. Musoke appeared first on Voices of the ElePHPant.
Recently I received a question; if I could explain these four lines:
/**
 * @test
 */
public function it_works_with_a_standard_use_case_for_command_objects(): void
The author of the email had some great points.
public function testItWorksWithAStandardUseCaseForCommandObjects(): voidPHPStorm IDE from the last version gives for you ability to generate a TestCode and they do not use an underscore too:

I opened a popular frameworks (Symfony, Laravel, YII2, CodeIgniter4) test folders in Github and then I opened a popular PHP library and also do not find underscore usage in test and @test annotation.
This made me realize that, yes, what I'm doing here is a convention, and maybe it's not the most popular one. Well, I've seen tests that use an even less conventional approach to method naming by using some kind of character that isn't a space but still looks like one:
/**
 * @test
 */
public function it works with a standard use case for command objects(): void
This is too much for me, but who knows, in a couple of years maybe...
I'll first respond to the objections now:
it and it will complete this with /** @test */ public function etc. We'll talk about it later.Philosophically speaking, I don't think a test method is a regular object method.
Yes, of course, it is technically a method. PHPUnit instantiates your TestCase and will call its methods.
But that is just the way PHPUnit does it.
You might as well write something like this:
it('works with a standard use case for command objects');
In fact, there are test frameworks that let you write tests like this.
You will never find any normal code (a.k.a. production code) call these test methods. I do think that would look rather weird.
Instead of regular methods, I think we should consider test methods to be documentation or more specific: specification.
This makes other aspects than code style conventions more important: it needs to be readable and precise.
And in my experience testItWorksWithAStandardUseCaseForCommandObjects is really hard to read.
Then again, maybe I just have to practice.
But what if your code style fixer automatically turns "snake_case" method names into camelCase ones? Just configure the tool to ignore your tests.
try/catch blocks and coming up with inventive ways of dealing with exceptions.
Not because we have to, but because the IDE developers thought it would be a good idea.
End of rant.
Conclusion: don't let the IDE determine how you write your code (unless you have thought about it and agree with it of course).
When it comes to generating a test class and "generating test methods": totally ignore what PhpStorm hTruncated by Planet PHP, read more at the original (another 4445 bytes)
When the Gutenberg block editor was released as part of WordPress 5.0, a number of web designers were worried about the effect it would have on existing websites. Some vowed to keep using the Classic Editor for the foreseeable future.
But the newfangled block editor has settled in nicely. Its features and usability seem to improve with every new release. And the development community has contributed a number of handy custom blocks.
For new projects, going with Gutenberg seems like a great option. But what about existing websites? What does the conversion process look like? And, most importantly, what are the risks?
While every website has its own unique quirks, there are some general things to keep in mind. Today, we’ll cover the basics of converting your website to use blocks. Let’s get started!
If you have the Classic Editor plugin installed, making the switch to Gutenberg and the wonderful world of blocks is easy. However, it’s not recommended to do this without proper testing.
That means setting up a staging environment or local installation of your website. This will allow you to see how things work without risk of breaking a live site.
In addition to staging, it’s also worth looking at your active theme and plugins. You’ll want to do some research to ensure that they are compatible with the block editor. At the very least, it’s about making sure no major conflicts will arise from the change.
Thankfully, just about every theme or plugin that is regularly maintained by its author should be fine. However, if you have any legacy software that hasn’t seen an update in quite a while, you might have a problem on your hands. Only testing will let you know for sure.
So, what does a WordPress page or post created in the Classic Editor look like when you switch to Gutenberg? This was an understandable concern for a lot of us. In reality, it’s not too shabby:
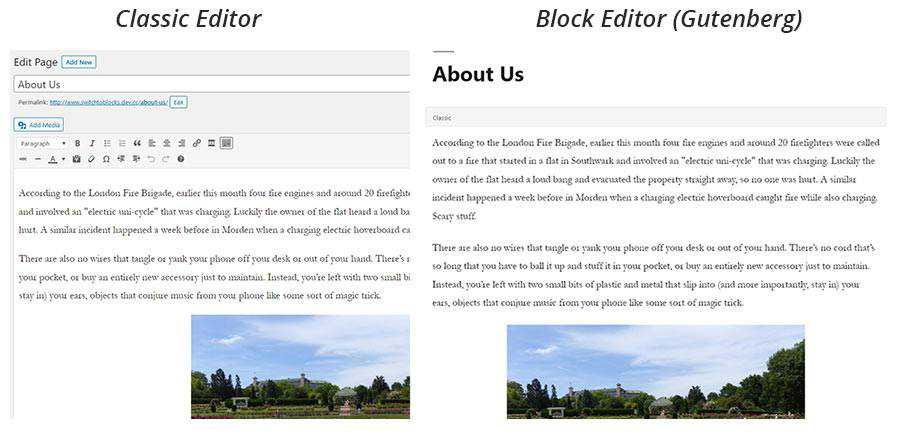
WordPress puts the existing content into what is called a “Classic” block, which is exactly like it sounds. This block recreates the experience of the Classic Editor, which will keep your content in tact unless and until you decide to covert it over to a series of blocks.
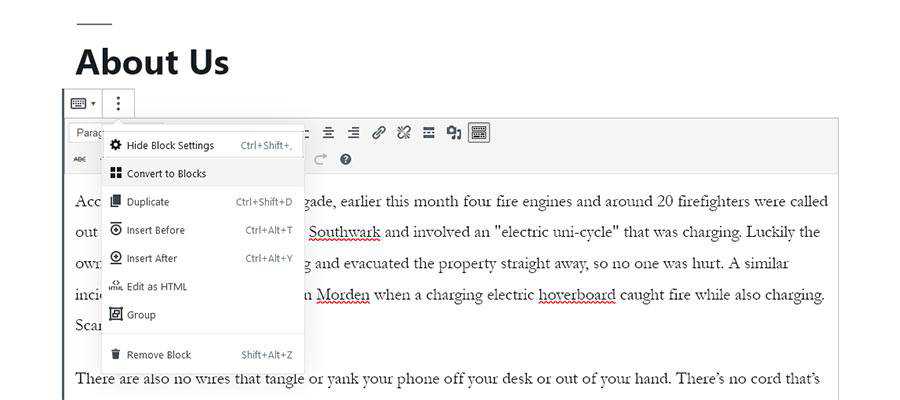
Converting is a straightforward process. Click the options button for the Classic block (it consists of three vertical dots) and choose “Convert to Blocks”. From there, Gutenberg will break your content up into individual blocks for headings, paragraphs, images and more.
The conversion is fast, and works great on simple pages. But what about something more complex?
In this example, we embedded both a YouTube video and added some custom CSS to part of the content. What does Gutenberg do with it?

The YouTube video was a piece of cake. Gutenberg converted it to a YouTube embed block, and it can easily be edited and moved around.

The transition for our custom CSS wasn’t quite as smooth, at least not visually. In instances where there is custom code, the block editor will convert it over to an HTML block. It may not be pretty at first glance, but it’s actually a positive step. This saves any customizations from being lost in translation.

At worst, keeping the HTML block will allow you to maintain custom code. The alternative is reworking the element as either a CSS class or maybe even a custom block.
The decision to go with the block editor is one that should be considered carefully – especially on an existing website. And, depending on how your website was built, there are a few potential sticking points to look out for:
It should be noted that page builder plugins and Gutenberg are completely different animals. Thus, there’s no built-in way to convert content from Elementor, Beaver Builder, etc. to the block editor.
That could mean a lot of manual labor. In addition, you might have to accept the fact that Gutenberg can’t do everything a page builder can. Some of the fancier features of your favorite page builder will likely require a custom block – or abandoning the look/functionality altogether – when converting over.
Custom fields have been a popular tool for customizing page templates and content types. Plugins like Advanced Custom Fields have been widely adopted because they make the process easier.
While custom fields generated through ACF still work with the block editor, their positioning within the edit screen has changed. They’re now at the bottom of the screen. That would be fine, except that ACF long allowed developers to position fields above the editor, or remove the editor entirely. That’s no longer the case.
The result is a more cluttered UI. One way around that would be to convert these custom field sets to blocks. Doing so lets you position fields within the content of a page and makes for a more seamless experience. That will take a bit more work, however.
Plenty of users have made the transition from the Classic Editor and lived to tell about it. But if you’re converting a website that your clients will update themselves, be prepared to provide some education and support.
While Gutenberg’s usability has grown by leaps and bounds, it’s still a different experience. Therefore, it’s going to take some time for your clients to adjust. This is something that needs to be discussed before making any decisions.
The fear of switching to blocks was and is understandable. There’s always a risk when making a major change to your website.
However, switching from the Classic Editor to Gutenberg is a pretty straightforward line for most websites. And, it’s perfectly fine to convert only the content you want to revamp. Everything else can safely stay in a Classic block and will work just as it always has.
Of course, the use of page builders and other complex tools can muddy up the process a bit. That’s why it’s a good idea to test on a staging environment first. It’s one of the key steps in your website’s transition.
Beyond that, it’s about considering what you stand to gain by using blocks. Things like custom layouts, easier content embeds and more flexibility come to mind.
If those seem like exciting benefits, then maybe it’s time to start building with blocks.
The post Tips for Converting an Existing WordPress Website to Use the Gutenberg Block Editor appeared first on Speckyboy Design Magazine.
During the past few summers, I’ve started a little tradition. Since I tend to have the house all to myself in the early morning, I sneak into my office and take some online courses. The daily sessions last about 30 minutes, before I start work for the day.
It’s been very beneficial, as I’ve brushed up on PHP and JavaScript, among other subjects. Not to mention that, unlike my school days, I’ve actually had fun learning new things.
I was looking forward to taking up the tradition again this year. But then the world went and changed. Suddenly, a pandemic meant that bit of extra time for learning just wouldn’t be there in the mornings.
To be blunt, the disruption of my precious routine is nothing compared to what others are experiencing and have lost. But it got me thinking that a lot of web designers have had to put their own goals on hold.
The question is, how do we manage these disruptions and avoid falling behind?
While COVID-19-related quarantines are the biggest disruption web professionals have faced, they’re not the first. Everyday life also has a way to pulling us away from learning and other personal projects. Just the obligations of running a freelance business or working on various client projects can do it – let alone events outside of work.
In this way, the challenge has always been there. You want to level up your skills, but it seems like there’s never enough time in the day.
Meanwhile, the web continues to move at warp speed. Those at the top of the food chain are building incredible UIs with React, while the rest of us try to figure out why our 3-line jQuery script stopped working.
Leveling up sounds great – but just try to get a quiet moment to work on it. Instead, making it through another day is seen a small victory.

So many of us, regardless of what niche we work in, put off our professional learning goals. Usually for good reason. They can range from raising children, being a caregiver to family or simply trying to make ends meet.
But the longer the delay, the harder it is to get back into the habit of learning. Plus, it could mean falling further behind on the skills we need to serve clients and compete in the marketplace.
Web design and development are fields that really do require a commitment to keep up with the times. The ability to stay with industry trends is of great importance. None of us want to be stuck using antiquated tools and techniques.
Then there is the personal aspect of learning. When you’re behind, you know it. You’re reminded of it in every tutorial for some fancy new tool, framework or CSS technique.
It’s easy to feel like you’re missing out – and that affects confidence. In turn, that impacts your ability to book new clients and build out your portfolio. It becomes a bit of a vicious cycle.

Each of us has our own style of learning. Not only does it include the methods we prefer to use (video, step-by-step tutorials, etc.), it also encompasses the environment around us.
For example, I really feel at my best in the morning. My head isn’t spinning from all the tasks I’ve had to handle nor the inevitable challenges that pop up. Having that uninterrupted quiet time to learn just works for me.
As difficult as it can be to accept, that idyllic situation just doesn’t exist right now. So, the choice is either to forgo learning or make the effort for self-improvement – even in imperfect conditions.
That may mean brushing up on skills at less-desirable times and when others are buzzing about the house. It may also require an uneven schedule. Maybe it’s a matter of fitting in 30 minutes on Monday night, then 45 minutes on Thursday afternoon.
Disjointed as that is, at least it’s progress. And maybe that’s the bigger point. If we wait for the “perfect” time to level up, we may be waiting for a very long time. Perhaps it’s better to take advantage of the opportunities in front of us, even if they don’t fit our narrow definition of ideal.
In the end, the act of having learned something new is all that matters. The rest are just details.
The post Making Time for Your Professional Learning Goals appeared first on Speckyboy Design Magazine.
Cost monitoring in Google BigQuery can be a difficult task, especially within a growing organization and lots of (independent) stakeholders that have access to the data. If your organization is not using reserved slots (flat-rate pricing) but is billed by the number of bytes processed (on-demand pricing), costs can get quickly out of hand, and we need the means to investigate or "debug" the BigQuery usage in order to understand:
Previously, we had to manually set up query logging via Stackdriver as explained in the article
Taking a practical approach to BigQuery cost monitoring
but in late 2019 BigQuery introduced
INFORMATION_SCHEMA views
as a beta feature that also contain data about BigQuery jobs via the
INFORMATION_SCHEMA.JOBS_BY_* views
and became generally available (GA) at 2020-06-16
SELECT
  creation_time,
  job_id,
  project_id,
  user_email,
  total_bytes_processed,
  query
FROM
  `region-us`.INFORMATION_SCHEMA.JOBS_BY_USER

SELECT * FROM `region-us`.INFORMATION_SCHEMA.JOBS_BY_PROJECT

SELECT * FROM `region-us`.INFORMATION_SCHEMA.JOBS_BY_ORGANIZATIONINFORMATION_SCHEMA.JOBS_BY_USER
view for all jobs that have been run in region US in the currently selected projectcost_in_dollar is estimate by calculating the total_bytes_processed in Terabyte and
multiplying the result with $5.00 (which corresponds to the the cost as of today 2020-06-21).
Also, we only take those costs into account if the query was not answered from the cache
(see the cache_hit != true condition)creation_time is converted to our local timezoneWHERE clause to filter
on the partition column creation_timeJOBS_BY_PROJECT with JOBS_BY_USER or JOBS_BY_ORGANIZATION
While playing around with the INFORMATION_SCHEMA views I've hit a couple of gotchas:
region-us in the view specification) and
must run the job in that region (e.g. from the BigQuery UI via
More > Query Settings > Processing location)US
can only access resources in location US. Though it would be very helpful for organizations that actively use different locations,
something like this is not possible:
SELECT * FROM
(SELECT * `region-us`.INFORMATION_SCHEMA.JOBS_BY_ORGANIZATION)
UNION ALL
(SELECT * `region-eu`.INFORMATION_SCHEMA.JOBS_BY_ORGANIZATION)JOBS_BY_USER view seems to "match" the user based on the email address. My user email adress is a @googlemail.com
address; in the user column it is stored as @gmail.com. Thus, I get no results when usingTruncated by Planet PHP, read more at the original (another 1126 bytes)