My career as a freelance web designer began in 1999. In those days, the web was a nascent medium. Most businesses had just begun to have an online presence (if they had one at all). And websites were generally simpler in terms of the technologies they utilized.
Fast forward to today, and the evolution is remarkable. While knowing CSS and HTML are still a requirement, it seems like every other aspect of the job has become more complex. In addition, the marketplace is saturated with competition.
For those looking to start a freelance web design business, the degree of difficulty has never been steeper. Yet the appeal of freelancing hasn’t diminished. Designers are still hoping to reap the many benefits and freedoms that come with the territory.
As a new freelancer, how can you thrive in modern times? Let’s take a look at the challenges you’ll face and how to successfully navigate them.
Client Expectations Are High
In the web’s earliest days, merely having a website was enough for many clients. That doesn’t hold true today.
Clients are more web-savvy than ever. They’ve grown accustomed to shopping on Amazon and navigating various web applications (banking, social media, etc.). As such, they often have a better grasp of the look and functionality they want for their website.
That’s not to say that they necessarily understand what it takes to get the job done. It’s more that their expectations tend to reflect what the giants of the industry are doing. Good or bad, people want what others have.
As a freelancer, part of your job is to understand the project requirements. From there, you’ll need to communicate the pros and cons, along with the best methods for implementation. This is an area where you’re likely to spend a lot of time, making project estimates more difficult.
How to Successfully Navigate the Challenge
Quite often, communication is the key to success when it comes to client expectations. Provide a realistic view of what the project requires and how much it will cost.
It’s also fair to point out any potential issues you foresee. For example, if an expensive feature may not provide much benefit, it’s worth taking the time to explain why. In addition, there could be negative consequences for accessibility that need to be addressed.
This lays a solid foundation for the project and accomplishes two things: It builds trust and helps to manage expectations.
A Highly-Competitive Marketplace
An organization looking to build a website has more options than ever. There are an untold number of freelancers or agencies to choose from. And if geography isn’t a concern, the possibilities could span the globe.
Then there are a variety of DIY website building products. These providers offer turnkey solutions that don’t necessarily require expertise in web design. Simple websites can be built with minimal effort, although the quality of the finished product can vary. Still, these solutions might be a good fit for those on a limited budget.
If you’re just entering the industry, the competition can feel overwhelming. Standing out among a crowded market is hard to do for industry veterans – let alone for a newcomer.
How to Successfully Navigate the Challenge
This is where specialization comes in handy. It’s not about booking every project – it’s booking the right ones. You don’t need to cover every inch of the marketplace. Instead, carve out your own little corner of it.
Doing so requires a more targeted approach. Find the types of clients and projects that interest you, then market yourself accordingly.
However, it’s worth noting that this is a long-term process. Thus, there’s no need to panic if you aren’t sure what your niche will be. The more experience you gain, the more likely you are to discover the path you want to take.

Websites Are Increasingly Complex
Back in the day, it was common for newly-minted freelancers to start with small, low-cost projects. It was a great way to fill out your portfolio before moving on to bigger and better things. That may not be as viable now, thanks to the growing complexity of how websites are built.
Smaller projects still exist. But it’s becoming harder to find ones that will turn a profit and provide equally-valuable experience. Instead of digging into custom code, you’re more likely to spend time tweaking the settings of a WordPress theme and a few plugins.
The other part of the equation is in the mind-boggling number of technologies in use. Content management systems (CMS), static site generators, and JavaScript frameworks seem to grow on trees these days. Every time you turn around, there’s pressure to learn and adapt.
As a solo freelancer, you have only so much time to dedicate to learning. That is if you actually want to make a living in web design. Keeping up with trends is a constant battle.
How to Successfully Navigate the Challenge
The reality is that you don’t need to know everything. And you certainly don’t have to learn all of your skills at once. It’s an ongoing process.
This is another area where specialization pays off. Pick a handful of technologies that interest you (even better if they help you make money). Learn the basics and increase your knowledge as your career advances.
What’s more, you’ll have the opportunity to evolve. You might find new tools and techniques that will allow you to continue growing.
How to Meet the Challenges of Today’s Web
The web design industry landscape has changed significantly. Thus, the challenges that go along with starting a freelance business have also ramped up.
Freelancers are entering a mature market, rather than a burgeoning one. Client expectations are higher than ever. Experienced designers and developers, along with DIY website builders, provide stiffer competition. And the technologies involved are vast and increasingly complex.
While it may sound daunting, these are challenges you can meet head-on. The key is in paying attention to the details and planning for where you want to go.
There will undoubtedly be ups and downs. But building a successful freelance web design career is still within reach.
The post The Modern Challenges of Starting a Freelance Web Design Business appeared first on Speckyboy Design Magazine.
WordPress 5.9.1 is now available!
This maintenance release features 82 bug fixes in both Core and the block editor.
WordPress 5.9.1 is a short-cycle maintenance release. The next major release will be version 6.0.
You can download WordPress 5.9.1 from WordPress.org, or visit your Dashboard → Updates and click “Update Now”.
If you have sites that support automatic background updates, they’ve already started the update process.
For more information, browse the full list of both Trac and GitHub changes in the release candidate post, or check out the version 5.9.1 HelpHub documentation page.
Thanks and props!
The 5.9.1 release was led by Jb Audras and George Mamadashvili.
Special props to @sergeybiryukov for running mission control.
Thank you to everyone who helped make WordPress 5.9.1 happen:
Albert Juhé Lluveras, Alex Lende, alexstine, André, Anton Vlasenko, Ari Stathopoulos, ArteMa, Ben Dwyer, BlogAid, Carolina Nymark, Channing Ritter, Chris Van Patten, Colin Stewart, Daniel Richards, David Biňovec, David Smith, Dion Hulse, Dominik Schilling, Eddy, Ella van Durpe, Erik, Fabian Kägy, Flinim Asso, gadhiyaravi, George Hotelling, George Mamadashvili, glendaviesnz, Greg Ziółkowski, ianatkins, Ian Belanger, ironprogrammer, itsamoreh, Jb Audras, Jeff Ong, Jeremy Herve, Joe Dolson, Joen A., John Blackbourn, Jonathan Desrosiers, Jorge Costa, Juliette Reinders Folmer, KafleG, Kapil Paul, Kjell Reigstad, linux4me2, Lukman Nakib, manfcarlo, Marius L. J., mgol, nidhidhandhukiya, Nik Tsekouras, Omar Alshaker, Paolo L. Scala, Pascal Birchler, Paul Bearne, Pavlo, Petar Ratković, Peter Wilson, Petter Walbø Johnsgård, Phil Johnston, Piotrek Boniu, ravipatel, Riad Benguella, Robert Anderson, Rolf Siebers, Sergey Biryukov, stacimc, Stephen Bernhardt, Sven Wagener, Team Staatic, Tim Nolte, Tonya Mork, webcommsat AbhaNonStopNewsUK, WebMan Design | Oliver Juhas, wpcharged, wpsoul, Yunus Ertuğrul, and Rafi Ahmed.
Thanks to @estelaris, @pbiron, @ironprogrammer, @bph, @abhanonstopnewsuk and @threadi for their help to test the release package.
Package:
Summary:
Present quizzes using INI configuration files
Groups:
Author:
Description:
This package can present quizzes using INI configuration files...
Read more at https://www.phpclasses.org/package/12396-PHP-Present-quizzes-using-INI-configuration-files.html#2022-02-22-06:53:20
Package:
Summary:
Generate classes to access MySQL database tables
Groups:
Author:
Description:
This package provides a tool to Generate classes to access MySQL database tables...
Read more at https://www.phpclasses.org/package/12382-PHP-Generate-classes-to-access-MySQL-database-tables.html#2022-02-22-01:35:16
Latest PECL Releases:
Package:
Summary:
Implements a chatbot using Facebook Messenger
Groups:
Author:
Description:
This package implements a chatbot using Facebook Messenger...
Read more at https://www.phpclasses.org/package/12395-PHP-Implements-a-chatbot-using-Facebook-Messenger.html#2022-02-21-23:57:26
Package:
Summary:
Multiple agent helpers for single Facebook Chat
Groups:
Author:
Description:
Multiple agent helpers for single Facebook Fanpage Chat
We web designers sure do love design trends. Neumorphism, Glassmorphism, and now… Claymorphism. Take an interesting look and add “morphism” to the end – that’s how we roll.
So, what is Claymorphism? It’s a little bit retro with a hint of Material Design mixed in. These elements typically feature rounded corners along with beveled edges. The result is a softly-detailed 3D shape that practically jumps off the screen.
In some ways, it’s reminiscent of the ultra-thick images that were used back in the 1990s. Only this time around, designers don’t need to open up Photoshop. Instead, everything one needs is available via CSS.
If you’re looking to use Claymorphic elements in your designs, you’ve come to the right place. We’ve rounded up eight fun examples that have been modeled with creativity (see what we did there?) – enjoy!
UI Designs by Brandon Caples
Do you have trouble keeping track of design trends? This helpful snippet provides labeled examples for you – including Claymorphism. You might want to print this out and keep it for future reference.
See the Pen UI Designs by Brandon Caples
Claymorphism in User Interfaces by Shakhzod Tojiyev
Card UIs seem to be everywhere these days. They offer an effective means to make similar content items stand out. Here, Claymorphism is used to provide some extra impact without being visually overwhelming. The blue glow around the individual elements is a nice touch.
See the Pen Claymorphism in User Interfaces by Shakhzod Tojiyev
Ventilo by Bailh
This snippet shows that Claymorphism can go beyond static elements. Here, 3D shapes fly around the screen in a confetti-like animation. JavaScript powers the movement, but the clay adds to the overall aesthetic.
See the Pen Ventilo by Bailh
Claymorphic Dashboard * (Responsive, CSS Only) by Mozzarella
The design trend examples we share tend to focus on a single element. But it’s an extra special treat to find an entire screen devoted to a subject. This dashboard design features buttons, cards, and even a hero image. Be sure to check out the beautiful hover effects as well.
See the Pen Claymorphic Dashboard * (Responsive, CSS Only) by MOZZARELLA
Claymorphism Form Component by Albert
Here’s a real-world example of a Claymorphic container housing a form. Imagine this being utilized in a sidebar or perhaps even a modal window. The effect is subtle – making it a perfect fit for a business website.
See the Pen Claymorphism Form Component by Albert
Claymorphism by Preethi
While there’s nothing fancy about this snippet, it does offer a look at how this trend could apply to an alert message. There’s something to be said for the simplicity here. It grabs your attention, but in a friendly way (the emoji doesn’t hurt, either).
See the Pen Claymorphism by Preethi
wip by Ward Larson
We found a few developers who dared to combine Claymorphism with other trendy looks. This one pairs up the newbie with Glassmorphism, resulting in an ultra-cool UI. The semi-transparent glass container goes beautifully with the smoothly-beveled button.
See the Pen wip by Ward Larson
Untitled by Scott Shields
Perhaps the title of this snippet is uninspiring – but the work itself is quite meaningful. It utilizes Clay.css, a framework that adds Claymorphism to design elements. This is perhaps the quickest solution for those who want to dive headfirst into this style.
See the Pen Untitled by SS
Better Design through Clay
At first glance, Claymorphism may look a bit lighthearted and silly. And it certainly is capable of that kind of aesthetic. However, the potential is there to go deeper.
When utilized with a degree of subtlety, the style could be just the thing to liven up any type of website. It helps to create a natural separation between design elements (such as cards) and makes for a more intuitive UI (3D buttons). That could benefit everyone from bloggers to retailers and beyond.
Looking for more Claymorphism snippets? Check out our CodePen collection!
The post 8 CSS Snippets That Bring Claymorphism to Life appeared first on Speckyboy Design Magazine.
Lately I've been rediscovering the joy of PHP. Also been helping an MVP get off the ground which uses a lot of nocode/lowcode bits and pieces and miraculously puts them together.
Anyway, I had to write to an Airtable table with PHP and some quick googling didn't find an example to copy-paste so I'm writing this one for posterity.
So I have a table called people which has Name and Email fields. I want to write to it programmatically. Airtable has this pretty cool documentation which uses existing data from your real tables as examples. Search "airtable api" and you'll find your way.
There you'll see things like this:
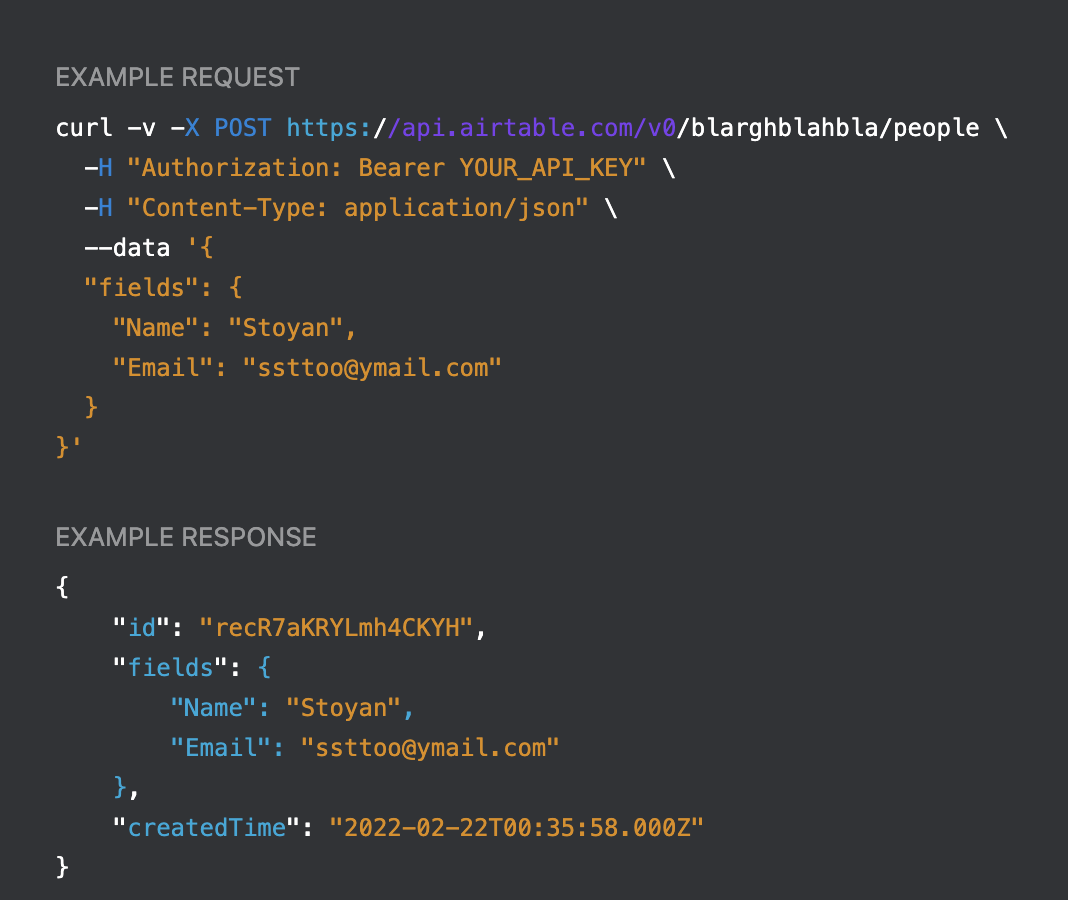
Here people is the table name and blarghblahbla is the the AirTable app ID (obfuscated). This is generated for you so no need to worry about it, just copy. The question is to turn it into PHP code.
Oh, you'll also need your Airtable key which you get from your account:

Armed with these prerequisites, here's the PHP code that uses cURL to write to the table:
// get this from your account
$airtable_key = 'keyeKanyeOladiOblada';

// URL generated by the docs
$url = 'https://api.airtable.com/v0/blarghblahbla/people';
$headers = [
  'Content-Type: application/json',
  'Authorization: Bearer ' . $airtable_key,
];

// this is the JSON-encoded record to write to the table
$post = '{"fields": {"Name": "Stoyan", "Email": "ssttoo@ymail.com"}}';

$ch = curl_init();
curl_setopt($ch, CURLOPT_URL, $url);
curl_setopt($ch, CURLOPT_POST,1);
curl_setopt($ch, CURLOPT_POSTFIELDS, $post);
curl_setopt($ch, CURLOPT_RETURNTRANSFER, 1);
curl_setopt($ch, CURLOPT_HTTPHEADER, $headers);

$result = curl_exec($ch);
curl_close($ch);
$json = json_decode($result, true);
Et voilà!
In this twenty-fifth episode of the WordPress Briefing, Executive Director, Josepha Haden Chomphosy discusses future-proofing the WordPress project with the Five for the Future pledge.
Have a question you’d like answered? You can submit them to wpbriefing@wordpress.org, either written or as a voice recording.
Credits
References
Transcript
Episode 25
Josepha Haden Chomphosy [00:00:00]
Hello everyone, and welcome to the WordPress Briefing. The podcast where you can catch quick explanations of the ideas behind the WordPress open source project. Some insight into the community that supports it and get a small list of big things coming up in the next two weeks. I’m your host, Josepha Haden Chomphosy – here we go!
Josepha Haden Chomphosy [00:00:42]
I have a non-mailbag mailbag question that I would like to answer for y’all today. Non-mailbag because no one actually emailed me about it and mailbag because Twitter is basically like a giant mailbag. And I do get a lot of DMS about this particular topic. If you want to send something to my actual WP Briefing mailbag, you can send it to wpbriefing@worpress.org.
Josepha Haden Chomphosy [00:01:06]
But the question that I frequently get asked in my DMS on Twitter is: what is Five for the Future? It’s not always that tidy the question, but that still is the question we’re answering today. So if you take a casual survey of active contributors to the WordPress project, the high-level answer that you’re likely to get to that question is “a way to remind people to give back to the project.” Or, if you run in more business-y circles, you might hear that it is an initiative that encourages companies to give back 5% of their resources.
Josepha Haden Chomphosy [00:01:40]
And both of those answers are true. So a quick mini-history lesson; the original concept of Five for the Future came from Matt Mullenweg in 2014. There’s a lovely blog post on it that I will link in the notes below, but it was essentially a call to any companies experiencing success with WordPress to contribute back to the project and make sure that the project was a success.
Josepha Haden Chomphosy [00:02:07]
The initial program then included outreach recognition, et cetera, proposed in 2017 by Tracy Levesque and Ian Dunn. Then that was defined and formalized with the help of the WordPress community in 2018. And then, in 2019, we had our first trial run with entire dedicated teams sponsored by companies inside the WordPress ecosystem.
Josepha Haden Chomphosy [00:02:36]
So that’s the mini-history lesson chronology of this program. The intentions that informed the work of building the program in 2017 have become a bit lost to the ages. So I’m here to share it with you. The basic heart and soul of the Five for the Future program is to make sure that there is a way to refresh the commons of the WordPress community and ecosystem.
Josepha Haden Chomphosy [00:03:00]
And as a result, ensure that the common resources of WordPress are available long after we have stopped being available to care for them. If you are familiar with the concept of the tragedy of the commons, Five for the Future was created to help avoid that tragedy. There were two original goals for formalizing the program.
Josepha Haden Chomphosy [00:03:22]
The first one was to acknowledge companies that participated in Five for the Future by sponsoring contributors to work on the WordPress project. And the second was to motivate more companies to sponsor more volunteers. Either by hiring them and paying them to contribute or by assigning their existing employees to contribute to the WordPress project.
Josepha Haden Chomphosy [00:03:46]
Of course, it’s hard to quantify participation and hard to qualify what should be seen as an impactful contribution, which is why when the program was originally created, it was in partnership with team reps and community members who were active at the time. There are many posts around that discuss the next steps for this program.
Josepha Haden Chomphosy [00:04:07]
And as I’m looking through them, the next steps revolve around some of the hardest and most important questions that we have to answer as a project and as stewards of open source. Those questions are things like:
- How do we remain true to these gloriously subversive values of WordPress and open source while also finding a way to thoughtfully secure our organization’s future?
- Does contributing without the expectation of reciprocity hold up when we are looking at how to acknowledge contributors who sustain us?
Josepha Haden Chomphosy [00:04:40]
And if you’re familiar with Elinor Ostrom’s award-winning work, Governing the Commons, you may also be wondering how this particular program aligns with her eight principles designed to sustain organizations like ours.
Josepha Haden Chomphosy [00:04:57]
As an aside to that last question, this particular program does not have all eight principles accounted for, but among WordPress’s many programs, we do account for most of them. Although imperfectly, as is the way with human beings, that’s probably a whole episode unto itself, I did want to quickly answer that particular question.
Josepha Haden Chomphosy [00:05:16]
So to get back to my non-mailbag, mailbag question, if I had to tell you in the span of an elevator ride what Five for the Future was, this would be my answer. It is a v1 program with a dual goal of boldly declaring the need to refresh the shared resources of WordPress and offering the ways and means for communities and individuals alike to participate in refreshing those resources.
Josepha Haden Chomphosy [00:05:45]
If you want to learn more about the Five for the Future initiative, you can check out wordpress.org/5. Like literally just the number five. Or, if you want to learn more about the program that has grown from the Five for the Future initiative, you can check out the white paper that’s linked in the notes below.
Josepha Haden Chomphosy [00:06:11]
And that brings us now to our small list of big things. Number one on my small list, the planning post for WordPress 6.0 is out. I’ve included a link in my massive list of links below. But it includes our best guess at timing, features that we intend to include, and a call for volunteers as well. So if you are looking for ways to give back, that is a clear and immediate option.
Josepha Haden Chomphosy [00:06:38]
The second thing on the list is if you are a team rep, don’t forget that we have daylight saving time ending and starting depending on your hemisphere within the month. If you move meetings, if you’re in a team that moves your meetings, discuss it now so that folks have time to adjust their calendars.
Josepha Haden Chomphosy [00:06:55]
And the third thing on my small list of big things is that there’s a suite of Full Site Editing courses that are now available on learn.wordpress.org. I will add that to my giant list of links below, but I encourage you to wander on over and see what all the fuss is about. I think the courses are excellent. They’re great for folks who don’t quite know what Full Site Editing is yet, but then also they give you a few intermediate tips and tricks as you’re getting your legs underneath you.
Josepha Haden Chomphosy [00:07:27]
So, that my friends, is your small list of big things. Thank you for tuning in today for the WordPress Briefing. I’m your host, Josepha Haden Chomphosy. I’ll see you again in a couple of weeks.

