In Expressive, we have standardized on a file named
config/routes.php to contain all your route registrations. A typical file
might look something like this:
declare(strict_types=1);

use Zend\Expressive\Csrf\CsrfMiddleware;
use Zend\Expressive\Session\SessionMiddleware;

return function (
    \Zend\Expressive\Application $app,
    \Zend\Expressive\MiddlewareFactory $factory,
    \Psr\Container\ContainerInterface $container
) : void {
    $app->get('/', App\HomePageHandler::class, 'home');

    $app->get('/contact', [
        SessionMiddleware::class,
        CsrfMiddleware::class,
        App\Contact\ContactPageHandler::class
    ], 'contact');
    $app->post('/contact', [
        SessionMiddleware::class,
        CsrfMiddleware::class,
        App\Contact\ProcessContactRequestHandler::class
    ]);
    $app->get(
        '/contact/thank-you',
        App\Contact\ThankYouHandler::class,
        'contact.done'
    );

    $app->get(
        '/blog[/]',
        App\Blog\Handler\LandingPageHandler::class,
        'blog'
    );
    $app->get('/blog/{id:[^/]+\.html', [
        SessionMiddleware::class,
        CsrfMiddleware::class,
        App\Blog\Handler\BlogPostHandler::class,
    ], 'blog.post');
    $app->post('/blog/comment/{id:[^/]+\.html', [
        SessionMiddleware::class,
        CsrfMiddleware::class,
        App\Blog\Handler\ProcessBlogCommentHandler::class,
    ], 'blog.comment');
}
and so on.
These files can get really long, and organizing them becomes imperative.
Using Delegator Factories
One way we have recommended to make these files simpler is to use delegator
factories
registered with the Zend\Expressive\Application class to add routes. That
looks something like this:
namespace App\Blog;

use Psr\Container\ContainerInterface;
use Zend\Expressive\Application;
use Zend\Expressive\Csrf\CsrfMiddleware;
use Zend\Expressive\Session\SessionMiddleware;

class RoutesDelegator
{
    public function __invoke(
        ContainerInterface $container,
        string $serviceName,
        callable $callback
    ) : Application {
        /** @var Application $app */
        $app = $callback();

        $app->get(
            '/blog[/]',
            App\Blog\Handler\LandingPageHandler::class,
            'blog'
        );
        $app->get('/blog/{id:[^/]+\.html', [
            SessionMiddleware::class,
            CsrfMiddleware::class,
            Handler\BlogPostHandler::class,
        ], 'blog.post');
        $app->post('/blog/comment/{id:[^/]+\.html', [
            SessionMiddleware::class,
            CsrfMiddleware::class,
            Handler\ProcessBlogCommentHandler::class,
        ], 'blog.comment');

        return $app;
    }
}
You would then register this as a delegator factory somewhere in your
configuration:
use App\Blog\RoutesDelegator;
use Zend\Expressive\Application;

return [
    'dependencies' => [
        'delegators' => [
            Application::class => [
                RoutesDelegator::class,
            ],
        ],
    ],
];
Delegator factories run after the service has been created for the first time,
but before it has been returned by the container. They allow you to interact
with the service before it's returned; you can configure it futher, add
listeners, use it to configure other services, or even use them to replace the
instance with an alternative. In this example, we're opting to configure the
Application class further by registering routes with it.
We've even written this approach up in our documentation.
So far, so good. But it means discovering where routes are registered becomes
more difficult. You now have to look in each of:
-
config/routes.php
- Each file in
config/autoload/:
- looking for delegators attached to the
Application class,
- and then checking those to see if they register routes.
- In
config/config.php to identify ConfigProvider classes, and then:
- looking for delegators attached to the
Application class,
- and then checking those to see if they register routes.
The larger your application gets, the more work this becomes. Your
config/routes.php becomes way more readable, but it becomes far harder to find
all your routes.
One-off Functions
In examining this problem for the upteenth time this week, I stumbled upon a
solut
Truncated by Planet PHP, read more at the original (another 2999 bytes)
Eventually, every website will require a redesign. And each one presents its own set of unique challenges.
Among the most challenging are large, content-heavy WordPress websites. Why? For starters, they often come with several different types of content to account for. Plus, their existing setup may not be as ideal today as it was when the site was originally built. And, if content is regularly added or changed, this throws yet another monkey wrench into the works.
All told, there is a lot to consider. That’s why it’s so important to plan ahead. While there will always be pain points, being prepared will make the process that much smoother.
So, before you tackle that next redesign project, let’s review some ways to get into the best position for success.
Review the Content Structure
First up, you’ll want to take a close look at how content is structured. Even if you were the one who originally built the website, it’s still a good idea to refresh your memory.
Things to look for include:
- Parent and child pages
- Taxonomies such as categories and tags
- Custom post types
- Navigation menus
Once you have a better picture of how the existing content is set up, you can then determine whether any changes should be made. For instance, if all the site’s pages are currently at the top level, does it make sense to reconfigure some of them as a “child” page under a more generalized “parent”?
It’s also important to ensure that the site’s navigation accurately reflects the hierarchy of content. This not only looks better on the front end, but will help to avoid unnecessary confusion on the back end.
The main idea is to make sure that the site’s content is structured efficiently and in a way that makes sense for both users and content creators. Of course, there’s just about always room for improvement. But that must also be weighed against the potentially time-consuming task of making changes.
Dig into the Code
Now that you know the various content considerations, it’s time to take a look at the existing WordPress theme. This will provide you with a clearer picture of any custom functionality that may or may not need to be replicated on the redesigned version.
Among the items to look for:
- Whether the active theme is a child theme or standalone
- Any custom code or scripts being loaded within the
functions.php file
- Customized page templates that use the WordPress template hierarchy
Because a WordPress website can be put together in any number of ways, it’s vital to know the exact piece of code that is powering a specific function. While plugins may be responsible for some features, others could be the result of custom code within the theme.
For example, you might find that the site’s slider is being run by a custom jQuery script, rather than a WordPress plugin. Or perhaps there are custom fields being called in a page template – something that you would have to account for within the redesign.
Just as with the content structure mentioned above, the goal is to learn more about what you have to work with. Not every bit of custom code from the existing theme may need to be moved over. But it’s better to know this from the beginning, rather than find out it’s missing after the site has launched.

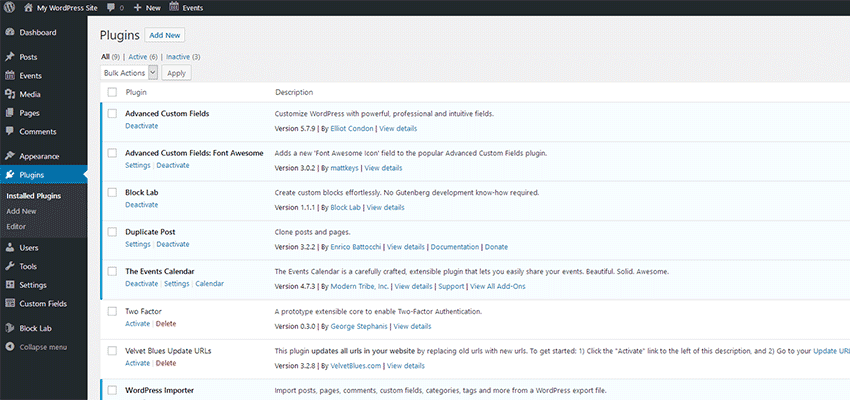
Make Note of Active Plugins
We love WordPress plugins because they help us add maximum functionality with very little effort. But just because a plugin has served us well in the past doesn’t mean it should be part of our future.
A redesign is a perfect time to perform an audit of any plugins that are currently active. Some will undoubtedly move on with you to the redesigned website. However, you may find that others are no longer necessary.
It could be that their functionality is no longer needed or perhaps they weren’t really being utilized in the first place. Then there is also the chance that there is another option out there that can do the job better.
But the most important reason to review plugins is to potentially rid yourself of security risks and dead weight. Plugins that haven’t been updated in awhile could both hurt performance and be an open invitation for hackers or bots. It’s all part of that fresh start we’re looking for.
Create an “In-Development” Plan
Most likely, you’re not going to do all of your redesign work on a production site. Therefore, the bulk of the process will take place on a staging site. That’s ideal, as you’ll have the freedom to work without fear of an inadvertent mistake causing downtime.
On a website that doesn’t see much in the way of new or updated content, the process is fairly easy. You may have to account for a few changes before launch, but it shouldn’t become a major obstacle.
However, a site that is frequently changed is certainly more of a challenge. It’s important to devise a plan to account for this.
It could be a matter of syncing the databases every so often in order to ensure that your staging site always has the latest content. Then again, there may be differences in structure that make this process more complicated.
There isn’t really a one-size-fits all solution here. So much depends on how your existing website has been built. You may be fortunate and find a plugin that does the heavy lifting for you. Or, you could be relegated to a more bespoke approach. Regardless, it should be a major consideration when redesigning a busy site.

Leave No Stone Unturned
Beyond a great look and layout, so much of a redesign’s success relies on picking up on the details. The bigger the website, the more of those important little tidbits that you’re likely to uncover. And, while the items above will have you off to a running start, there are always more places to look.
Depending upon your install, you might also want to consider things like SEO plugin settings (particularly on-page customization), custom plugins, image sizing and analytics. If any of these items aren’t accounted for, you could be missing something important when the new site launches.
But no worries, because you’ve got this! Pay attention to the details, take notes and (if necessary) ask questions. Add your terrific design skills to the mix and prepare to receive a few pats on the back for a job well done.
The post The Best Practices for Redesigning a Large WordPress Website appeared first on Speckyboy Web Design Magazine.
Not long ago, I was confused about doing math with money and floating
point issues. After a bunch of research and help from friends I figured out
what many already did before me: Using floating points is indeed bad. You can
get rounding issues and really want to use ‘precise math’.
After that, I realized I wanted to use the new Ecmascript bigint type as
a basis for representing money. This is supported by recent versions of Node.js
and Typescript, which is where I need it.
There’s a problem though, the bigint type only holds ‘whole numbers’ and
doesn’t do fixed-point decimal-math. I looked around on NPM for something that
would abstract this for me, but couldn’t find a library.
So I spent a couple of days writing a simple npm library called bigint-money
that wraps the bigint type. It’s written in Typescript and open-source so
it’s here for anyone to use: https://www.npmjs.com/package/bigint-money.
Major features:
Benchmark
Most ‘money’ libraries on NPM only use 2 digits for precision, or use
Javacript’s “number” and will quickly overflow.
The only comparible library I found was big-money. It’s probably
the best alternative if your Javascript environment doesn’t have support
for bigint yet.
My simple benchmark calculates a ledger with 1 million entries.
        bigint-money  |   big-money
ledger       816 ms   |   43.201 ms
%            100 %    |     5294 %
The benchmark script can be found in the repository.
I want to stress though that I can’t take credit for this (pretty good) result.
The library is fast because bigint is fast.
I did need to implement a few functions myself, and I actually feel that
somebody who’s better at writing fast code could probably do a much better job
than I did.
I imagine that specifically the moneyValueToBigInt and bigintToFixed intenral
functions could probably be optimized by someone much smarter than me.
Examples
This is how it generally works:
// Creating a money object.

import Money from 'bigint-money';
const foo = new Money('5', 'USD');
It’s possible to create a new money object with a Number as well
const foo = new Money(5, 'USD');
However, if you pass it a number that’s ‘unsafe’ such as a float, an error will be thrown:
const foo = new Money(.5, 'USD');
// Unsa
Truncated by Planet PHP, read more at the original (another 10860 bytes)